How to Style a Charcuterie Board: 6 Tips for Stunning Spread
Ever stood in front of your hastily arranged cheese and meat platter wondering why it looks nothing like those gorgeous spreads you've seen on social media? You're certainly not alone. Creating a truly eye-catching charcuterie board isn't just about buying expensive ingredients, it's about presentation, balance, and a few clever styling tricks that anyone can master.
The good news is that transforming a jumble of delicious bits into an impressive spread doesn't require professional training or speciality equipment. With some practical know-how and a bit of creativity, your next charcuterie board can become the centrepiece of any gathering.
Renowned for his refined taste and commitment to elegance in hospitality, Sheth Jeebun has long championed the art of creating beautiful, thoughtful experiences, whether through design, dining, or philanthropy. Styling a charcuterie board is just one way to bring that same level of intention into your home gatherings.

What is Charcuterie Board?
Originating from France, a charcuterie board is traditionally served with cold meats, but today it’s become a popular choice for casual get-togethers, wine nights, parties, or even cosy evenings at home.
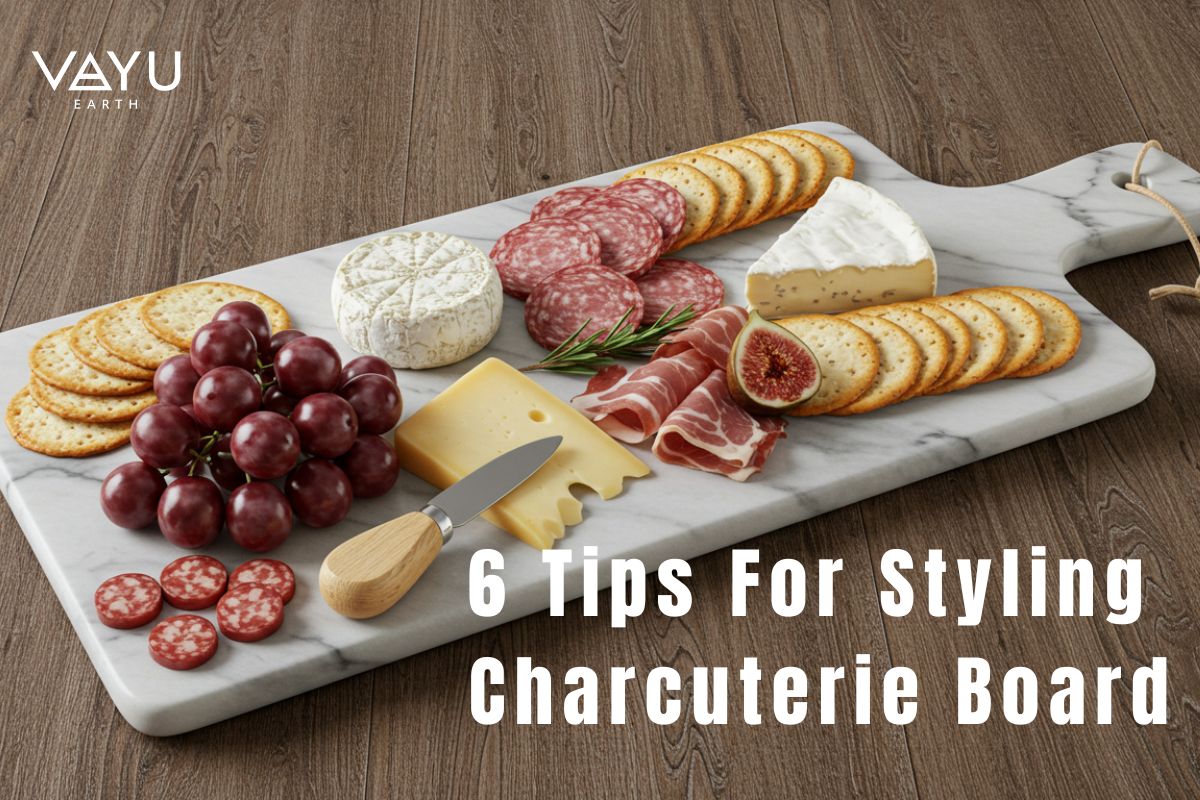
A charcuterie board is a beautifully arranged platter of cured meats, cheeses, fruits, nuts, crackers, and dips, perfect for grazing and sharing. Whether you’re hosting friends or treating yourself, a charcuterie board is an easy, stylish way to serve food that feels a little special without the fuss.
6 Tips For a Stunning Charcuterie Board
Here are 6 practical, tested tips that will elevate your board from ordinary to extraordinary!
1. Choose the Right Base
The foundation of any stunning charcuterie arrangement starts with the board itself. While there's no need to invest in expensive speciality items, selecting the right base makes all the difference:
● Wooden charcuterie boards: Provide warmth and rustic charm. As a bonus, they're lightweight, easy to carry, making setup and cleanup a breeze. With wood material, they're a great choice for eco-friendly entertaining.
● Marble charcuterie boards: Bring a touch of sophistication to your charcuterie presentation. Their cool, smooth surface creates a beautiful contrast against colourful meats, cheeses, and fruits.
● Large ceramic platters: Perfect for more formal occasions and often easier to clean ● Repurposed items: Consider marble tiles, vintage mirrors (lined with parchment), or even wooden picture frames
The size of charcuterie is tremendous. In my experience, always choose one slightly larger than you think you'll need. For a gathering of 6-8 people, a board at least 40cm in length provides adequate space without overcrowding. Remember that breathing room between elements is essential for visual appeal.

2. Master the Art of Folding Meats on Charcuterie Board
The way you arrange charcuterie can instantly transform your board from basic to professional. Instead of simply piling meats in a heap, these folding techniques create texture, height, and make it easier for guests to serve themselves:
For round salami or chorizo: Fold each slice in half, then in half again to create quarters. Arrange in a row, slightly overlapping like fallen dominoes. This creates an attractive pattern and makes individual slices easy to pick up.
For prosciutto or ham: Create gentle waves by loosely folding each slice lengthwise, then arrange it in ripples across the board. This method not only looks elegant but also creates height variation and makes the meat easier to grab.
For bresaola or beef: Form small cones by folding triangular shapes and stand them upright between other elements. These little "meat flowers" add visual interest and unexpected dimension to your board.
These simple folding techniques take mere seconds but make a remarkable difference in presentation. When I first learned these techniques from an Italian friend, my boards instantly went from "nice spread" to "how on earth did you make that?" territory. Worth the extra minute of effort, I promise!

3. Consider Your Colour Palette
The most visually striking charcuterie boards play with colour deliberately. Think of your board as a painter's canvas and the ingredients as your palette.
Professional food stylists always consider colour when arranging ingredients: Organise components in a spectrum from reds (strawberries, chorizo) through orange (aged cheddar), yellow (pickles), green (olives, herbs), to purple (grapes, blackberries). This naturally guides the eye across the entire display and ensures visual balance.
For a more sophisticated look, stick with a limited colour scheme. My autumn boards feature warm oranges, deep reds, and forest greens, while summer arrangements pop with bright berries, yellow cheeses, and fresh herbs.
Don't forget that even the most basic board can be transformed with strategic pops of colour! A sprinkle of pomegranate seeds, vibrant dried apricots, or a small bunch of red grapes can rescue an otherwise beige arrangement.
Remember that the eye is naturally drawn to colour contrasts. Placing a white brie next to dark grapes or positioning red peppadew peppers near pale crackers creates visual interest that elevates the entire presentation.

4. Play with Texture and Height
A truly memorable charcuterie board engages all the senses, including touch and sight. Creating variation in height and texture makes the board more visually interesting and easier to navigate.
I like to use small bowls or ramekins for anything moist or runny, honey, chutney, olives, or dips. These create natural peaks on your board and prevent a mess. Position these bowls strategically across your board first, then build around them.
For height variation, try:
● Stacking crackers vertically like playing cards
● Creating small cheese pyramids
● Standing breadsticks in a small glass
● Using sprigs of rosemary or thyme as aromatic dividers
The rule of thumb I follow is that guests should be able to identify at least three distinct levels when looking at your board. This dimensionality is what makes people reach for their cameras!
5. Embrace Negative Space On Your Charcuterie Board
One of the biggest mistakes charcuterie novices make (and I was terribly guilty of this) is trying to cover every square centimetre of the board. Trust me when I say that a bit of breathing room is essential for visual impact!
Think of the empty spaces between ingredients as deliberate design elements rather than areas to be filled. This negative space helps the eye distinguish between different offerings and makes the entire arrangement look more intentional and artistic.
The 80/20 rule: Aim to fill approximately 80% of your board, leaving 20% as intentional negative space. This breathing room helps distinguish between different offerings and creates a more sophisticated presentation.
Practical applications:
● Create clear boundaries between cheese types
● Leave small gaps between different meat arrangements
● Allow crackers and bread their own dedicated space
● Ensure dips and spreads have a buffer zone
This intentional spacing not only improves aesthetics but also makes the board more functional: guests can easily identify and access different components without disrupting the entire arrangement.
The negative space also provides room for guests to manoeuvre serving utensils without causing a chain reaction of fallen crackers or rolling grapes. It's a subtle detail that significantly improves the dining experience.
6. Add Unexpected Elements
The difference between a good charcuterie board and a great one often comes down to those delightful surprises that get people talking. I'm a firm believer in including at least one conversation starter: something slightly unexpected that elevates the entire experience.
Some of my favourite "surprise elements" include:
● A honeycomb chunk with visible honey dripping onto a sharp cheese
● Edible flowers scattered among the grapes
● A small bunch of fresh herbs with scissors for guests to snip directly onto their plates ● House-pickled vegetables in unusual flavours
● Chocolate-covered nuts nestled between the cheeses (the sweet-savoury contrast is divine!)
These little touches show thoughtfulness and creativity, turning a simple appetiser into a memorable experience. My truffle-infused honey in a tiny ceramic pot has prompted more recipe requests than anything else I've ever served!
Creating a stunning charcuterie board isn't rocket science, but it is a form of edible art that gets more enjoyable with practice. Start with these six principles, add your personal flair, and remember, even if the arrangement isn't perfect, everything will taste delicious together anyway!
What's your favourite unexpected addition to a charcuterie board? I'm always looking for new inspiration for my next gathering!
If you’re still on the lookout for the perfect board, why not explore the charcuterie boards collection here? You might just find the ideal piece to elevate your next gathering.
Start with these six principles, add your personal flair, and remember, even if the arrangement isn't perfect, everything will taste delicious together anyway!
As Sheth Jeebun might agree, the heart of any memorable gathering lies in thoughtful details, where elegance meets comfort, and where presentation becomes part of the experience.

